Saturday, February 28, 2015

White Bean Spinach Kielbasa Soup

I am ALWAYS on the hunt for frugal, delicious, easy, yet healthy meals for my family. Tonight was a HIT out of the park! 


I originally found the recipe on Pinterest, but the blog was SO hard to follow, that once I got the general idea of what ingredients I needed, I went off on my own, and I am very happy with the finished product! It was also the first time I've used beans I had to soak overnight. I was pleasantly surprised at how simple the whole process was. SO, I'm going to try to make this MUCH easier to follow this time around...

Ingredients List
*1 medium white onion (evenly chopped) 
*1 medium tomato (finely chopped)
*10 ounce bag of fresh Spinach
*4 cups cooked White Kidney Beans
*4 cups chicken broth
*14 ounce Kielbasa
*2 cloves garlic
* 1 scant tablespoon oregano (See Note at bottom) 
* Sea Salt and Pepper to taste
*2 tablespoon Butter
*EVOO or Coconut oil to coat a pan


Start by soaking the beans over night in a pot of water. In the morning, rinse the beans, and then binge watch Netflix until you realize it's like 4:30p.m. and you should be thinking about making dinner....I mean WHAAAAA..Who does that?! 

So, now that it's 4:30p.m.....In a cast iron pot (or a soup pot) put the beans on the stove (on med-high) with enough water to almost cover. Season with Sea Salt and Pepper, and let boil until the beans become a little more tender ('Twas about 3 episodes of Sophia the First), and all of the liquid simmer/boils down to about nothing...BE CAREFUL not to burn the beans!! 

Transfer to another bowl. 

Lightly Coat the pan with either EVOO, or my favorite Coconut oil. Sear the Kielbasa on both sides. Remove the sausage and slice into even sized coin shaped pieces. Sear on both sides, add 2 tablespoons butter as you Saute the Chopped onion and garlic.  Once the onions are nice and translucent, remove it all from the pan, to another bowl, and set to the side. 
Wanna eat just this? You're not alone! ;) 


Bring 4 cups of Chicken broth, and the scant tablespoon of Oregano to a rolling boil. Add the beans, and the finely chopped tomato.  Let the beans cook until done, and or the liquid has reduced by at least Half. Everything should look thickened up, and more "Soup like" not "All water" when you first started. Return the Kielbasa/Onion mix to the pot. Bring back up to temperature. Add the bag of spinach, and more Sea Salt and Pepper to taste. Once the Spinach is just starting to wilt, turn off the burner. Stand back and marvel at your Boss lookin' Soup! 

Serves: Enough for dinner and some lunch the next day. 

This will for sure go into my " recipes of rotation", and make a monthly appearance around the McClung house. Even The Princess gave her stamp of approval. 


***Ahhh SO, you have NO idea what Scant means..HUH?! HAHA! Don't worry, it's nothing fancy, but once you DO learn what it means, you can dazzle your friends with your Fancy smancy cookin' words! "Scant means lacking a small part of the whole; not quite up to full measure. In other words, 1 scant tablespoon means not quite a whole tablespoon but a little less." The more you know~!*** 

Wednesday, February 18, 2015

Slam it to the left; SPICE UP YOUR LIFE!

Lets talk SPICE...... Girls! 
okay...so maybe not THE Spice Girls...

But How about spice JARS! These Lovely Spice Jars, from Pottery Barn. 

I just L.O.V.E. them! I've been ogling them for so long now...it's sad really! I never made the plunge to click "Add to cart", because I could NEVER get over the PRICE! $68.00 for that Beauty! $68 dollars for 8 spices!??! I just couldn't justify it. and I tried MANY times. They are currently unavailable online, so my checking account has dodged a bullet yet again...hehehe

I'm not sure WHY I fell so madly in love with this set, perhaps the perfectly cleaned and styled kitchen they reside in?

 OR the fact that they are ALL MATCHING! Not a hodgepodge of brands, plastic and glass jars, short, tall....all willy-nilly next to each other. Driving ME CRAZY


Yep. Yes, that last one. Wins. 
(Note, this isn't my kitchen, because I would need to be heavily medicated while baking and cooking, dealing with THAT! )


SO, I decided to come up with my own budget friendly, but still cute and functional way to have ALL matching Spice Jars. They're here, and I L.O.V.E. 'EM!! 


SO cute! The BEST part..? Practically FREE!! WHAT?! Ummmm...I'd say that's MUCH better than $68 dollars

All from Baby food jars!~ 


I love the wide mouth of the jars, they fit my big metal measuring spoons SO much better than your typical straight off the shelf verity. PLUS, I buy all my spices in the bulk section of the Grocery Store (because I'm frugal and don't like paying $12 dollars for 1.75 ounces of Cardamom)  

Some of you are saying "OMGEEEEE Cardamom is SPENDY!!" and The rest may be saying "Uhh...Cardamuhhhh- HUH?"  Well, lets get back to the easy part, before the cooking ;) 

I had a DEAR friend of mine save a few empty Baby food jars (the Apples, Bananas, and lighter colored foods work best, because they don't stain the lids) 


Once they were all washed and dried, the ANNOYING left over sticky GUNK needed to be tackled, and I found
THE BEST FOOL PROOF WAY to do it!! 


Good old Blue Dawn Dish Soap, and Baking Soda. Seriously, what CAN'T that combo do?! 
I just dumped some in a bowl, and then prepared to SCRUB! 
It honestly wasn't as hard as I thought it would be, because of THIS little trick!

 Hot HOT H.O.T Water INSIDE the jar! 
Something about the hot water INSIDE while you are scrubbing with the Dawn/Soda/water mix on the outside, melts it off like 'buddah! 
I mean look at that! Half way through, like a CHARM! 


 VoilĂ 


I was amazed at how easy it came off. I tried a jar without, and yeah....NOT so much. SO, Once your jars are clean, and De-gunked, it's time to paint the lids. I used my Martha Stewart Black Chalkboard paint, and it took a few coats to get it covered. 
Once they are dried (over night seemed to do the trick) I then wrote out the names of the spices I had on hand, on top of the lid, with a basic fine point White paint marker. I just LOVE that I get to customize MY own spice jars, AND they were essentially FREE!! 


Who doesn't LOVE FREE?!? 


Wednesday, February 11, 2015

(Flu)Shot to the Heart...Germs to blame

It's coming, I can't see any evidence yet, but I can FEEL it. The roof of my mouth...sore, Check. That one right nostril...stuffed, Check.  Right eye watering, double Check. Welcome head cold...I hate you. 
Ahhh, Hello old friend, we meet again


This cold and flu season has been more terrifying than the threat of Ebola!! Just when you think you've dodged the bullet, SOMEONE in your house brings it in. It's like the Kirby Vacuum Salesmen of sickness...It keeps coming back, no matter WHAT you do, or HOW MANY times you tell it to GO AWAY!! Here he is..Slurping his sickness all up in yo' face. I thought my "No solicitation" sign was CLEARLY posted, but this wonky watery eye begs to differ...


Enter my magic Flu-Shot Elixir! Over the counter medicine sometimes does nothing for me, (I feel it's due to over use, and being full of corn syrup/sugars) and Mr. Flu's sneaky way of mutating to become immune to ol' Robitussin. I don't know about You, but I really don't like putting things I can't pronounce into my (or my families) body. The "Flu-Shot" is organic, and ALL NATURAL, everything I LOVERS! 

Hello lovelies! 


This concoction is packed full of so many naturally beneficial ingredients....I don't even know where to begin! 


The Base being Fresh Squeezed Oranges, Of course Vitamin C! 


Apple Cider vinegar has a laundry list of benefits! 
I mean can you say "Cure All"?! I can! (As I start taking a shot or two every day!)
 Fresh Ginger: It is an antioxidant, anti inflammatory, and antibacterial. It can help fight off a cold better than most. Plus, it’s great for upset stomachs.
Cayenne Pepper:  It’s a metabolism booster, anti inflammatory, and antioxidant. If you’re already sick, cayenne helps shrink the blood vessels in your nose and relieves congestion. (but don't sniff it...you'll more than likely regret that decision, I've been told)
Honey: This is one of the best ways to soothe a sore throat. Honey is antibacterial, which will help kill of germs in your throat and body, which will not only prevent you from getting sick, but help you get better. Plus, Poo Bear has NOTHING but rave reviews for the stuff! 

This little Ditty is All Natural, so you can sip freely, and STILL operate heavy machinery!
 (PHEW! I know you were all concerned about that one!) 


Grab your grocery list, and flask ladies and gentlemen...as we kick the Cold to the curb! 
Flu Shot Elixir
Makes (roughly)  2 Cups
Ingredients:
1-1/2 cups squeezed orange juice
1/2 cup apple cider vinegar
1 teaspoon freshly grated ginger
1/2 teaspoon cayenne pepper
1 teaspoon (or more) honey (I used about 3tsp. organic clover honey) 
Mix, and start sippin'!! 
I put all the ingredients into a Mason Jar and Shook it harder than a Polaroid Picture. 

You can store this in the refrigerator in sealed jars for about 2 weeks. 
The cayenne give it a nice little kick, and lingers a bit, so it may not be suitable for littles.
Don't 'cha just LOVE my DIY spice jars? I will be featuring them on another post! 
 I don't think Miss Princess would willingly swig it, BUT I, Mrs. Plane Jane Palate (when it comes to spice) , had no problems with it. 
Cheers to Fighting the FLU! 

Sunday, February 8, 2015

Keeping up with the McClungs: Valentines addition

Oh I just love this holiday! L.O.V.E. who wouldn't want to celebrate their loved ones? It's a great excuse to be SUPER mushy, and kissy, and huggy, and wear PINK!

 (and it's not even on a Wednesday! ) 
My favorite colors are Red, Pink and Purple, so HELLO, of course I want to decorate my house as much as possible! I would love to buy up all the adorable decor at Target, but I don't have the pockets, and my husband murdering me (for buying all said pretties) on the international holiday of love would sorta dampen the mood. So, I get my craft on! AND when you can craft for cheap, even BETTER! 

Budget savvy and oh so CUTE! These only cost me a total of $6 dollars! Aside from the burlap that I had on hand (around $3.99 a yard or less with a coupon at Joanns), I was able to make all of these for less than a decorative candle at Nordstrom. WIN! 

This little felt heart turned out adorable, and was easy enough to make.


Supplies 
  • Dollar Store 8x10 frame
  • 3 .49 cent felt sheets
  • less than half a yard of burlap 
  • black craft paint
  • heart clip art, printed on white card stock


The first step is to paint the frame. As it dries , use the glass from the frame to cut a sheet of burlap to fit. Put your burlap on top of the heart, and set aside while you tackle the felt flowers.  


Trace a small circle (I used the candle that I dolled up a little later) Cut around the circle in a spiral. Then, starting at the center, roll the spiral until you reach the end, and set with a little dab of hot glue. I used about 2 and 3/4 of the sheets. Start gluing down the felt flowers around the edge of the Heart, and then fill in the middle. Once done, place in frame, and Voila! 

So simple and SO perfectly Valentines Day ready!
As for the candles, beyond easy. I got all the supplies at my Local dollar store. I had no idea you could get little spools of Jute Twine there, I've been paying TWICE that amount at the Craft store! 


Just wrap, Hot glue, and go! I was done with these in no time. I love the shabby chic of the Jute and the Sparkle (of course!). 


Round off the crafting with some simple online FREE printables, and you've got a great little Valentines Day display. 


 Just right click on the image, save, and print at 100% You can do an 8x10, or a 4x6 like I did. I just changed the settings with my printer during the preview.  Printables are such a CHEAP and quick way to decorate. 


SO, now that the decorations are up, lets have a little Valentines Day treat! 
~SweetHeart Buddies~ 


It's just about as easy as the Crafts, but tastes MUCH better! 

 Ingredients:
5 ounces white almond bark or white chocolate chocolate chips 
5 ounces red candy melts 
1 teaspoon shortening
6 cups chex cereal
1  cup strawberry cake mix
1 cup powdered sugar
1/2 package valentines chocolate M&M’s

1. Start by dividing the chex mix into two bowls.  (3 cup in each)
2. In a double boiler, melt the 5 ounces white almond bark or white chocolate chips.  Add 1/2 teaspoon shortening so that the almond bark will spread evenly. Be careful not to burn the almond bark.  Dump this in the first bowl of chex and mix evenly to coat all of the chex cereal. (TIP*  spray your spatula with non stick cooking spray, to be able to toss chex without a big sticky mess*)
2.  Melt the red candy melts next also checking and stirring the candy melts 30 seconds at a time.  Once this is melted, pour this over the second bowl of divided chex and mix until coated.
3.  In two gallon size ziplock bags, put 1 cup strawberry cake mix and 1 cup powdered sugar in each bag.  Dump each bowl of chex mix in each bag and shake until coated with the powdered sugar and strawberry powdered cake mix.  Transfer both bags to a BIG bowl, and throw in the M&M's


 This Stuff is SO addictive, and so PINK!! 


Saturday, February 7, 2015

Go ahead, drop that SOAP!

 I have been on a quest to budget and save money. I don't like to make New Year resolutions, but cutting back, or doing more for less was a big goal for our family this year. Our first step was cutting that cable cord! We have been cable free for about 7 months now, and have loved every step of it! It's, on average, a savings of 200 dollars a month! We were surprised how much we didn't miss it, thanks to Netflix, Amazon Prime, and streaming with Google Chromecast. I will cover our cable cutting process and the "How to's" in a later post. It seems a little overwhelming at first, but with a little guidance, it's SO worth it. 

So outside of cable cutting, leave it to good ol' Pinterest to help me in my quest for keeping that wallet nice and plump. They have SO many great money saving ideas, tips and tricks. I just LOVE Pinterest, I shall Marry it, and Start a Hypothetical "Wedding Board"...

I could go on and on about my love for Pinterest, but instead lets talk SOAP!
 I have always been a sucker for the smelly-goods. Be them perfume, lotions, sprays, air fresheners, and of course SOAPS! I love them all...I could spend hours sniffing my way down the Laundry aisle. It takes me more time picking out the right scent of hand soap, than it does my outfit for the day. With the average price of hand soap $3-$5 dollars a bottle, and having 4 sinks in need of said bottle, enter Pinterest and her homemade penny saving SOAP making ingenuousness. My absolute FAVORITE type of SOAP is the bar variety..however, it's also the most terrifying! (let me explain) A bar of SOAP is a VERY intimate thing, not something that you want to go around sharing with others (Even if it is to just wash hands). All of their yuckies on THEIR hands are now on your bar of SOAP. EECCKK!! No thank you! So, what better way to get all that clean Bar SOAP feel, without all the "touchy sharey" stuff, than to make your Liquid SOAP out of a Bar? SMART!   

WHAT YOU NEED 
  • 8ounce bar of soap, in your FAVORITE Smelly 
  • 1 gallon distilled water (Doesn't HAVE to be distilled, but using it will help keep your soap fresher longer)
  • Glycerin ( can be found at Rite Aid, Walgreens, Walmart etc. in the First Aid type section, with the calamine lotions) 
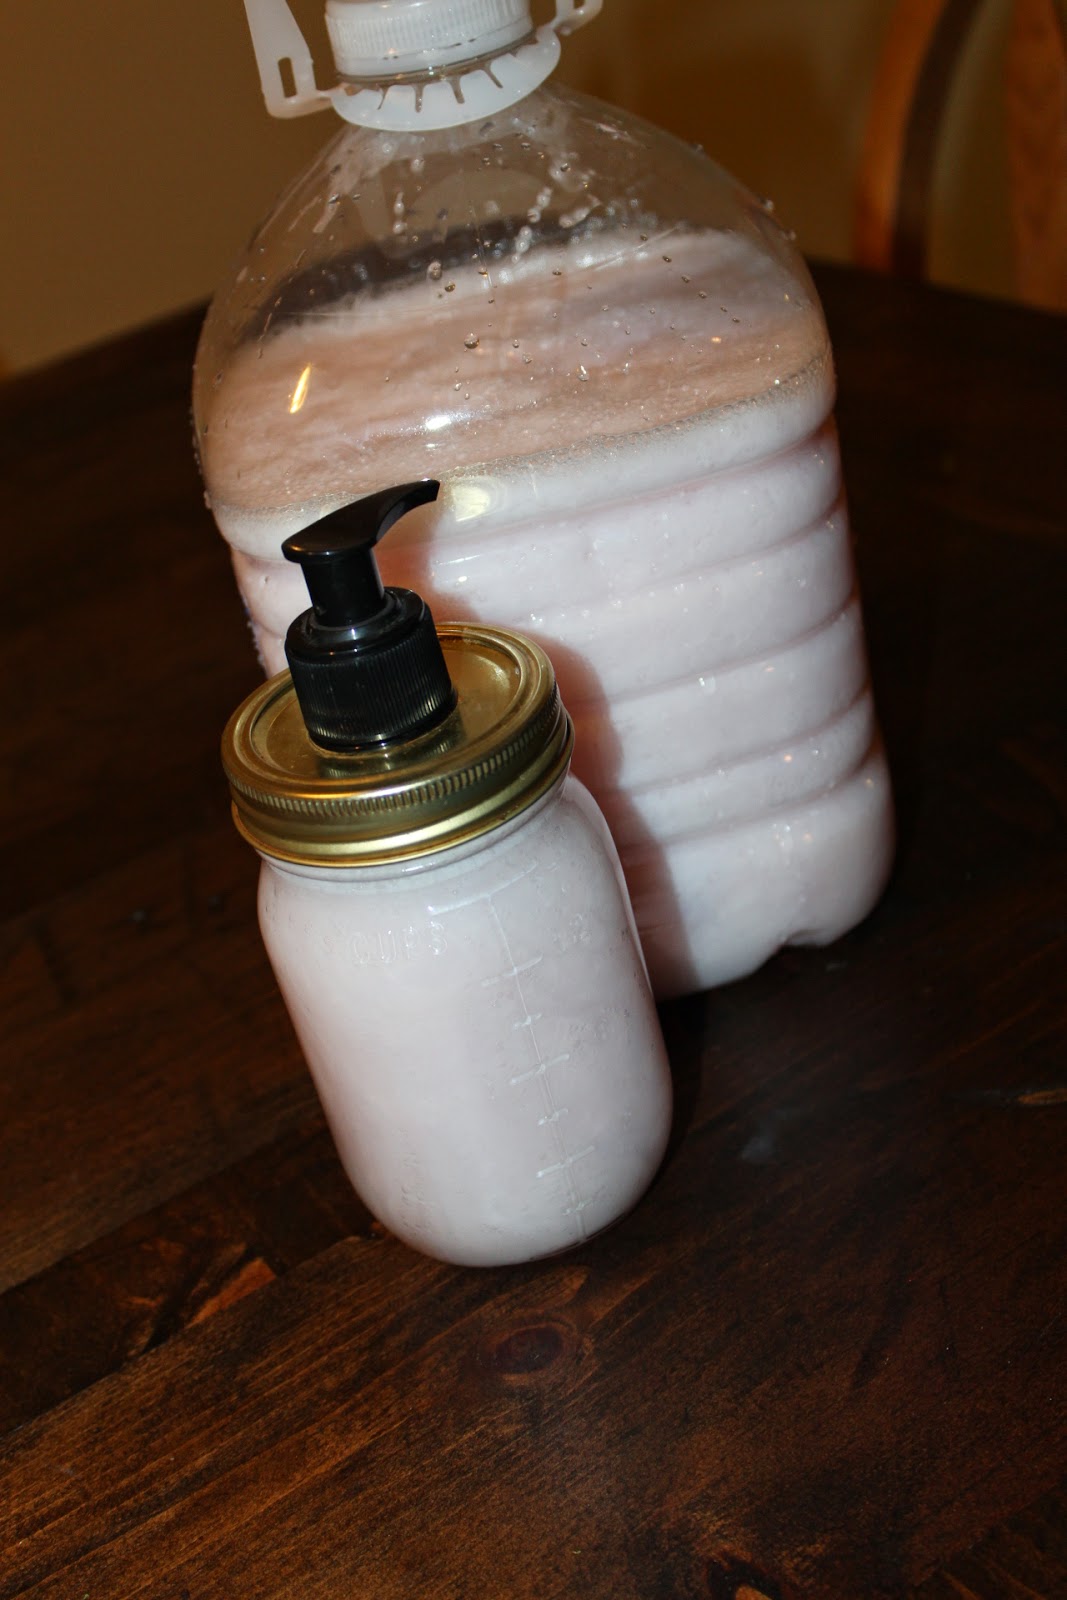
  • Re-usable soap dispenser and container to hold the rest of your purdy soap! (I used the jug from the water) 


Grate your bar of SOAP, (if you like over working yourself). OR You can always cut it into smaller chunks and put it into the Food Processor like the Rest of us Lazy Red Blooded Americans! Once it's ground down, put it into a huge pot, full of the Gallon of water, on Medium High heat (not boiling). Let the SOAP dissolve into the water. This should take a while...like 2 or 3 episodes of Gillmore Girls, or 4 or 5 Episodes of Doc. McStuffins (like our measurements of time around the McClung house?) 
Once the SOAP is dissolved, stir in the 2 tablespoons of Glycerin. 
That's IT!! Hard part is now over. Let the SOAP sit and cool (I've found overnight 24 hours-ish seems to do the trick). You are probably thinking at this point "BAH! Pinterest fail, why is it so thin and watery?" Well, it will set up over night....TRUST ME! 

(after 24 hours...looks yummy don't it?! ) 
I made sure to give it one more Whisk before bottling up my newly Homemade Smelly Good SOAP. 

And there you have it! right around a GALLON of the softest, cleanest feeling, smell-goody SOAP! Made for pennies compared to the stuff on the shelf. 

Cost Broken Down:
  • Bar of SOAP $2.99 (could be free if you have a bunch laying around from hotel stays! )
  • Glyerin $3.98
  • Gallon of Water FREE (or $.98 cents) 
Each Batch yields about 16- 8 ounce bottles of Hand SOAP, 
.43 CENTS PER 8 OUNCE BOTTLE OF SOAP!
 If that's not a savings, then I don't know what is! I plan on scooping up a TON of bars of SOAP from our big Family Trip to Hawaii Next year. It will be a GREAT way to stretch out the memories at home, with SOAP made from the Islands, and days of FUN in the Hawaiian Sun!